December 26, 2012

Subway Art

Forgot to post this!  I made this for Jerri Ann.  We had seen some at a craft show and I told her I thought I could do it myself.  It took me a month to find all the fonts or fonts that matched closely.  I don't care much for the frame but needed something and this was the best I could find around here.  Randy is going to make her a better one...one that looks more rustic and wider. I made a lot for her this Christmas...made this, made a shelf out of the window topper like I made last year for my woman exchange gift and a wall board that holds 2 jars with sphagnum moss and little daises in them.  I didn't get a photo of either of these...but maybe I'll get one when I'm at her house.

This is the last post for today...scroll down....there are two more post!

and, as usual, it looks much better in person than I can capture with my camera!  The background is solid black with a floral texture layer blended on top.  Gives it a much nicer look than plain black does. The only thing I'd like to have done different was printed on matte paper and had non-glare glass in the frame but when you put things off till the last minute, you have to work with what you have!  Especially if you live in the sticks like we do...LOL  I also think it would look nice on canvas...might have to try that if I can find some canvas cheap.

.....
Pin It!

Bulldog Football 2012

I can't believe how big he looks in this photo.  This was his last year to play football and he cried buckets after the last game of the season. He really, really loves playing it.  His school does not offer football at this time. They are debating on starting it but its a ways down the pike for now.  Hopefully, by the time he gets to high school, the sport will be added. 
Jerri Ann didn't want to pay the price for the photos that they take each year, so I took these after the season was over and before he had to turn his uniform back in. I've been printing all afternoon....just can't seem to get the print out right.  I have finally figured out to change my print driver from Epson Vivid to Adobe RGB and it seems to match my screen much better now.  Not perfect, but I can live with it! 

Scroll down..I posted twice today!

.....
Pin It!

Birthday Hoots


Had to throw this together this morning as the hubs is celebrating his 59th birthday today.  He almost made a Christmas baby but held off a day!  I fell in love with this card a long time ago and have had it pinned to my board.  I knew it was too girly for a man but I thought I could man it up a little to make it work.  I pretended that I had forgot his birthday this morning so I would have time to make the card after he left for work. He's been home for the past 4 days so I couldn't get one made.  Anyway, its not outstanding but it will work for short notice!  He'll love the wording inside...nope, I'm not adding that!  LOL...
Cardstock is AC and the owl is from KPM Doodles.  The twine and heart button are from Wally World and the font is Amanda's hand.  I don't care for the tag but have run out of time...he'll be here in about 30 minutes. I ran the brown stock through the cuddlebug for the line embossing and then distressed the edges.  Added white gel pen stitches around the owl.

....
Pin It!

December 21, 2012

Christmas Tags and Projects

These are the tags I made for Jerri Ann and I....I used the Penquins for the kids and she used the tree ones for her neighbor gifts.  She gives her neighbors some of her canned vegetables in baskets.


These were all cut on the Silhouette....the penguins were purchased off 2Peas and were drawn by Hero's Arts.  I didn't like the way the reds came out of the printer so I colored the hat band and scarf with my markers.  Added a pearl to the hat top and I didn't do it on these tags until after I had taken this photo but I put a white dot in their eyes and a tiny bit of pink to their cheeks...really made them stand out better.The paper I used was AC cardstock for the white, and the pattern paper was from Echo Park.  Made the tag myself and added some rhinestones to the tree and crystal lacquer to the star. 


I used paper from Pink Petticoat for these tags.  I really love the kraft/white look.  You get 6 or 7 different designs in white or cream.  The tree is paper from Cosmo Cricket.  Again, these were designed and cut on the Silhouette...very classy, don't you think?  Added green rhinestones and glitter to the star and some twine for the hanger.  I need to make some of these up for next year for me to use.

These were nothing special...I purchased the cut files from the Silhouette Online store and just assembled with paper.  These all hold the gift cards I got for the Chicago crew. The Santa's used all AC cardstock and I ran the beard, hat brim and mustache through the Cuddlebug with the swirls embossing folder.  The deer tag used more of the Pink Petticoat kraft/white paper with the deer cut out twice using brown and tan paper from my stash.  I then layered the antlers behind the deer head and gave it all a bit of distressing. Used some twine for the 'gift card' tag and around the outside of the pouch.  This holder has a tag you can pull out but it wasn't designed to hold a gift card. I added 'slots' to the tag so when you pull the tag, the gift card comes with it.  The present is another cut file that I used blue paper that I printed off first cause I wanted an inside and an outside.  The paper is from Michele Coleman called Winters Song. The silver is some more of that stash of mine that has been hiding in my cabinets for years...LOL  Which reminds me...I want to order some glitter paper.

And next up is the Christmas stockings I made for us and Jerri Ann, Randy and Gavin.  I had seen this idea on Silhouette Blog and she did it to make a garland for her tree.  I saw it as a tag for our Christmas stockings.  The stockings are made out of burlap and lined and cuffed with some linen material.  All purchased from Wal-Mart.  I had quite a time trying to figure out how to line and cuff with no seams showing but finally figured it out, after ripping out seams a couple times...LOL...The only thing I would have done differently was giving the burlap a layer of interfacing.  I think it would have made it easier to sew and gave it much more polished look in the end...but, its too late now and they still look good on the mantel.  I guess I need to purchase some of that Fusible interfacing to have on hand.
The tags were cut on the Silhouette in the star shape with Pink Petticoat Kraft/White paper.  I made the linen circles by hand basting and gathering and then cut the circle with some music paper from Glitz, I think....not sure as I forgot to tag it in my Silhouette program. Then I cut the initials on the Silhouette, ran them though my Xyron to add sticky and added the glitter...Once I had them glittered, I gave them a couple coats of Spray sealer so the glitter wouldn't fall off.  They were all attached together with glue dots but not too sure they will hold up on the material.  I need to find some glue that adheres material to paper but didn't have time to research and get it in now. I tied twine off the point of the star and they are held onto the stockings with clothes pins that I added glitter too in the same manner as the initials. They look awesome hanging together off the mantel!


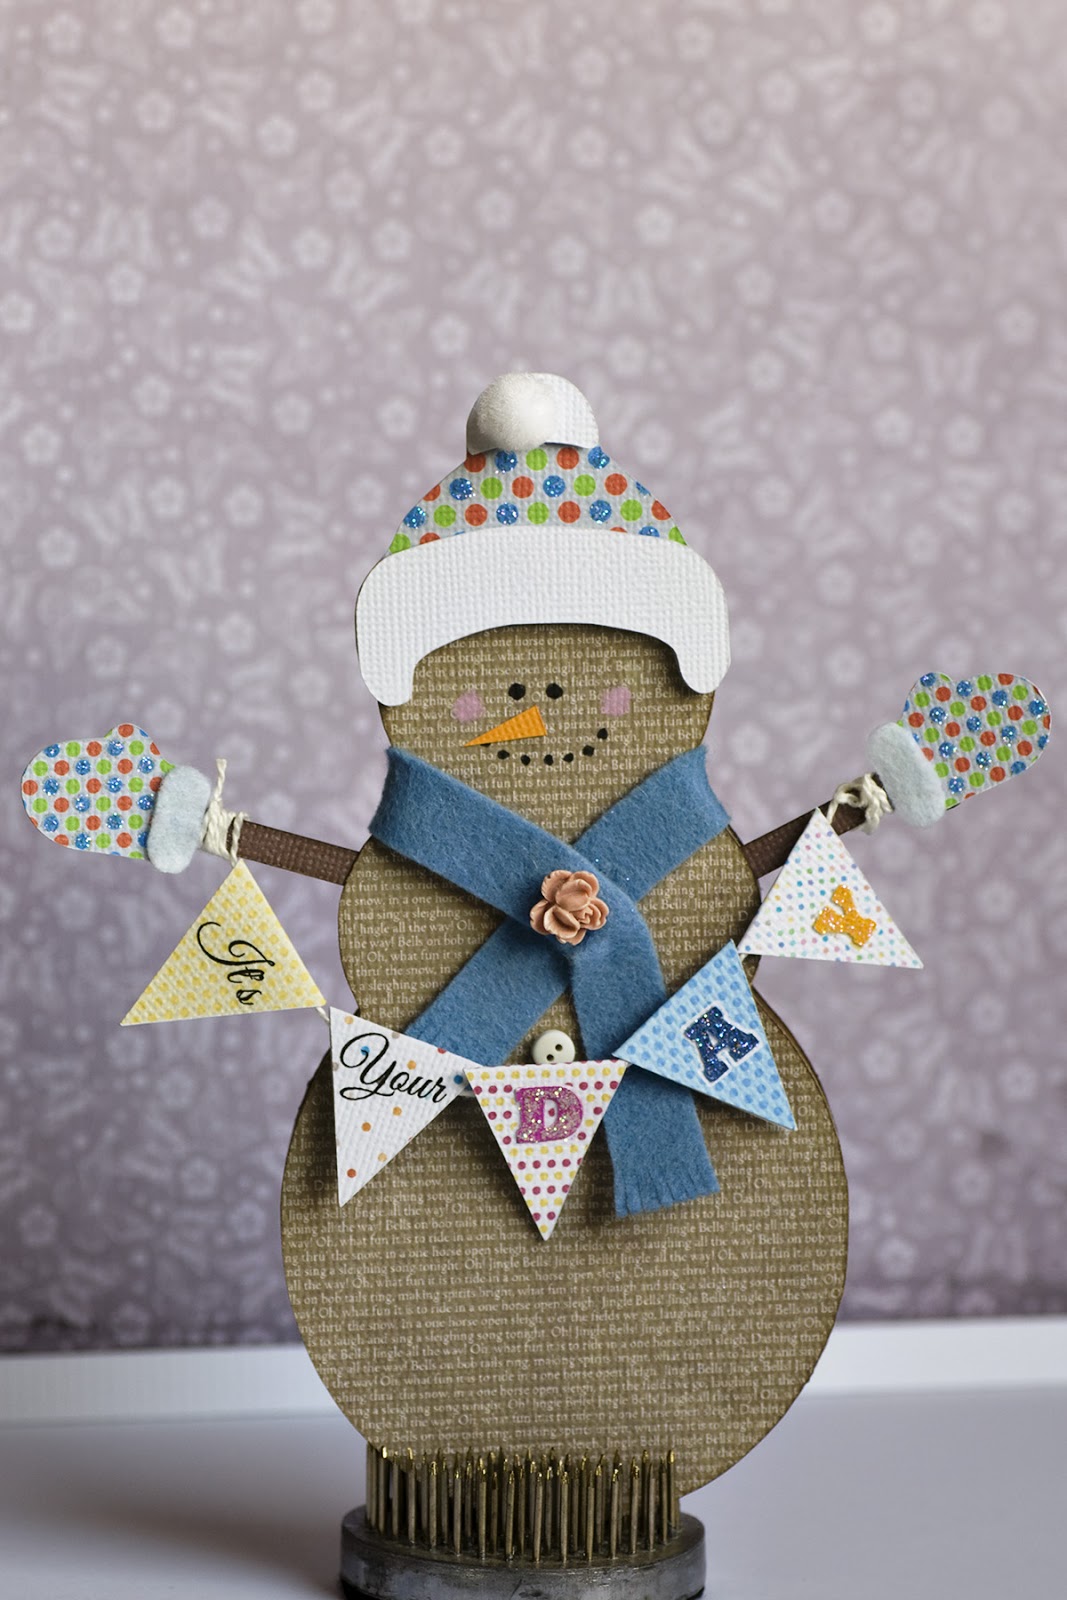
And the last thing I'll be sharing today is the birthday card I made for Brenda.  My Silhouette has gotten a work out the past month.  I can venture to say that I think I definitely know how to run it now...LOL
Cut the snowman out of AC cardstock after printing with Pink Petticoat kraft/white paper.  Used some paper from my pattern folder in the Silhouette Studio for the hat and gloves and plain brown AC cardstock for the arms.  I added a small round pompom to the top of the hat and glittered the blue spots in the hat and gloves. The banner was made with more paper from my patterns folder in Studio and I mirrored them all above and rotated them so I could fold it in half and hang on my embroidery floss.  Cut the little letters and glued them to the banner tags and then added glitter to them.  The scarf is some felt from PaperTrey Inc and the little rose is from a kit I got to make a bracelet with.  I think it came as a surprise grab bag from My Craft Channel.  Finished it all off with hand drawn eyes, mouth and nose and attached the back of the card with scor tape behind the hat.  Too stinking cute!!


That's All Folks.....

Don't forget to click on the images and view image, larger....gives a much, much nicer view of the projects!!


.....
Pin It!

December 20, 2012

Winter Storm Christmas 2012

Batten the hatches, tighten the sails.....wind advisory in the mid states!  And that is putting it mildly.....the winds have blown over everything outside, the snow is stuck so tight to the windows, I can't see out and its cold as ice! How much snow did we get?  Who knows...in places its bare...other places is a good 6 feet deep!  Yipppeeee....so glad I didn't have to get outside today!  The Christmas lights were on early this am so won't be on tonight and it's too dang cold and windy to mess with them now.  They will just have to wait till tomorrow!

I'm ready....gifts are wrapped, projects are done and house is almost cleaned up.  I have a beauty appointment in the morning and then I'm coming home to start some baking.  The kids are coming this Sunday, so Christmas will be early for the Axtell household.  I can't wait!

Will be posting images later today...if I get the house done.  But...no images of the snow storm....camera and camera operator can not function outside today!

....
Pin It!

December 18, 2012

Snaps of Christmas around the house

Needed to take a few snaps of some of my Christmas decorating to show you and it will also help me remember how I did it all when it's time to do it again next year.


Bowl of pine, mercury glass and acorn ornaments on the coffee table in the living room.


Tree in the living room decorated with copper, white, gold and silver ornaments.


Snap of one of a few new ornaments this year for the living room tree.


Bread bowl with pine, red, green and lime ornaments as a center piece on the table in the sun room.


Lantern on the buffet in the sun room. That plaid ribbon drove me nuts with all the glitter. I still have it everywhere even after the sweeper has been run several times but it's beautiful and I love it.


A fake place setting in the sun room......Fake because I need to wash all the glitter from that ribbon before anyone can eat off of them.
Pin It!

December 15, 2012

Santa is coming...you better watch out!

LOL....took a minute to take a shot of one of my favorite Santa ornaments. I have a full tree of them but only about a half dozen of them get to be called favorites. This guy happens to be one of them.


Basically, my count down is 8 days till Christmas....we are doing Christmas with Jerri Ann and family on the Sunday before. Am I ready? NO...not even close. But, it will come and go, just like it does every year and I'll complain that I didn't get to do all the things I wanted to do or enjoy the holiday as much as I'd like. And, again, I'll swear next year will be different and it never is....go figure! Taking time out today to watch Gavin play basketball. I just might drive around tonight and take in the Christmas lights.

Be sure and click on the image to get the full size view...its much, much better.  I wish they would make the preview images in better quality. 

 Looks like blogger has changed things up again!

.....
Pin It!

December 13, 2012

Christmas Card 2012

I am so glad the last of these are done.  I ended up mass producing 58 of them with envelopes.  The envelopes gave me a fit!  The first one I worked on for most of a full morning, only to print and cut it and it was WAY to small...guess I didn't know what a Baronial envelope was.  I bought the file and just printed and cut it to the size it was....back to the drawing board!  LOL The envelope you see here was by Lori Whitlock and it fit my card perfectly.  I had to do some tricking to the program to get that diamond paper to only print on the flap.  It wanted to fill the whole envelope.  It took all day to do the envy's.  I had to wait forever on my printer as its on the network and doesn't like being used...I'd type in my address, send it to the printer, wait for the dialogue box to come up (long wait) and then wait on it to 'send'...once it was sent, it didn't take any time at all to print and it all cut perfectly on the cutter. I started this printing process at 11:00 am and the last envelope came out of the printer at 4:30...(58 envelopes)....took less than 45 minutes to load each one of them in the cutter and cut them out.  Too bad my printer doesn't work as fast.  I really want to buy new wireless one but can't afford the 400.00 right now.  My HP is wireless but its only letter size and I needed the wide format for this project. Some day...

The card and envelope were designed completely in Studio Design Edition.  The paper is from Designs by Dani from her A lot like Christmas kit.  The snowflake and ornament were from the Silhouette store and were designed by Samantha Walker...I think....I know the ornament is by Samantha but in my mind the snowflake is by Lori Whitlock.  The Silhouette did a great job of printing and cutting. I can not image doing this with scissors anymore.  It took forever to cut the snowflakes but was well worth it cause they really set the card off.  I added glitter glue to them after they were cut. The sentiment banner I made myself.  Designed in the program and then sent it to the printer and cutter. 


I'm sorry I've rambled on and on and still haven't made any sense but here is the card!  If you have any questions, just ask....maybe I can answer better than explaining...LOL


Pin It!

December 12, 2012

2 year Planner


Needed to make a quick small gift for a friend and I know she loves and uses these 2 year planners. So I knocked this out pretty fast. Used digital scrapbook kit Memory Lane from Shabby Princess. Made the
clock and back banner tag myself but used her hands on the clock.


If you make one make sure it measures 7  3/8 x 6 3/16 or (7.375 x 6.1875) to get it to fit right.

Pin It!

December 11, 2012

Christmas tray

Photo tray for Christmas. Aren't those Carolers cute? Love that bustle. Everything cut out with the Silhouette and the Sunday paper. I do love this tray but I never use it as a tray just to look pretty. I'm still looking for one for you.

Pin It!

December 10, 2012

Salt & Pepper Chalkboard Printable


I really like all the chalkboard items floating around on Pinterest, so I had to give it a try. This is a cover for the little salt and pepper set that you pick up at the grocery store. I downloaded the chalkboard background from the web but I can't remember where. I'll find it later and give credit.
I'm sure you will notice that both of my shakers are pepper....Why I ended up with 2 peppers I'll never know but it will do for this snap. I'll pick up a new set on my next trip for grocery.
Just print cut and enjoy.
Pin It!

December 8, 2012

Card Assembling Day

Am I nuts or what?  It took me almost a full day to design my card, another full day to cut it all out and now it will take me most of today to assemble them all. Then I still have to address, stuff, stamp and mail....and to think I could have just got to the store, bought a $5.00 box of cards and been done in one day.  I guess the 'crafting' is bred into my blood!  I do enjoy it through and it gives me lots to do.


Again, this whole card was designed and cut by the Silhouette.  The snowflakes were the hardest for the machine to accomplish.  I cut 25 flakes at a time and it took the Cameo an hour and 15 minutes to cut the full sheet but they are so lovely and delicate.  I had to put in a brand new blade and I used my newest mat so the paper would really stick tight.  You can't see it in this picture but the little limbs have tiny stars on the ends.
I hope to have a completed card to share tomorrow.

.....
Pin It!

December 5, 2012

Count Down to Christmas

Here it is....I finished up and mailed the grands this am and Gavin got his last night.  It wasn't much but I think the kids will like flipping the numbers. I don't know what I'm going to do when the grands outgrow my hobby!!

All the paper is digital that I took into Design Studio.  I really like using it this way because I don't waste ink printing out a whole sheet just to cut a tree or star or .....you get my drift?  I saw this idea on another blog where she made it to be clipped onto a large clothes pin and I just adapted it to sit in the easels that we use to hold the monthly subway art. It is 4 layers thick.  I mounted 3 layers of the printed cardstock and then mounted it all on some chipboard I had saved from some shirts I'd purchased.  Gave it a nice sturdy feel but wasn't too thick to use my bind it all on. I still need to master the Bind it All...just can't get the coil bindings to curl properly and the instructions are pretty limited on which way to put the coil on the item or in the machine. As you can see, the numbers don't hang real straight but it could be my coil needed to be bigger.  I printed a 0, 1 and 2 for the first stack and then 0-9 for the second.  Basically, it is only good from Dec. 1st to the 25th.  The tree is a shape from the Design Studio.  I ungrouped it and then printed it out with 2 different patterns and one white and then layered it all with dimensional's.  Add glitter to the star and then just added some red pearls for the ornaments.  The Santa was from a kit made my Echo Park.  Did a print and cut and then added rhinestones to the bottom.  The whole layout was created and designed in Design Studio, printed out on the computer and then cut with the Silhouette.  I am so glad my scissors are getting dusty....LOL....

The first one is the one I made Gavin and my intentions was to just make an identical one for the Chicago grands but I ended up changing the paper and then my reds were too muted for the white so I grunged it up a lot. I think I like the second one best but I seem to like old, grungy items.


Now to get started on those Christmas cards!!

....
Pin It!

LinkWithin

Related Posts Plugin for WordPress, Blogger...