September 17, 2014

Hello Fall


This is it so far for my fall decorating and I don't think I'm going to do much more. Maybe some Mums and pumpkins outside. Not a very good shot but I don't get nice bright light in my kitchen like I do in the sunroom and I didn't have the time to move everything around just for a quick snap.


Here's the printable if you would like to use it help yourself.

Pin It!

August 19, 2014

Our Wonderful Crew

Oh, how we have grown!  We had a super time in Wisconsin and a wonderful 10 days with the grands this summer...we even got a family picture for a change!


Pin It!

July 20, 2014

Individual Blueberry Crisp


This is going to be our evening snack. Love these cute mini hobnail ramekins that I found at Pier 1 just the right size to keep me from eating to much.

I made a batch of Crisp topping and have it stored in the frig so I can make these whenever we want. These are blueberry because I had some fresh berries on hand but made some apple the other evening with canned apple pie filling. I used ¼ of cup fruit or pie filling and a ¼ cup crisp topping baked at 375° for 30 minutes. It makes a wonderful fresh baked snack.
I think I just may have to pick up some cherry pie filling on my next trip to the grocery store.

Crisp Topping
1 cup sifted all-purpose flour
1 cup sugar
¼ teaspoon salt
½ teaspoon cinnamon
½ cup soft butter

In a medium bowl sift together the flour, sugar, salt and cinnamon. Cut butter into flour mixture with pastry blender until mixture resembles coarse meal.

Bake  at 375° for 30 minutes or until topping is golden brown.

Store extra crisp in frig.


Pin It!

July 13, 2014

After the Rain


Went out after dinner and snap this of my Mandevilla Vine in the rain. It has reached the top of the pergola and starting to grow across the top. Hope I can keep it going.
Pin It!

Bing Cherries & Watermelon


This has been my afternoon snack for several days. Love these cherries and the watermelon with a little ground sea salt is perfect.

I noticed you got the butterfly deleted. Thanks.
Pin It!

July 4, 2014

Happy 4th of July


Wishing everyone a Happy & Safe 4th of July.

The Pledge of Allegiance free Printable can be download On Sutton Placed.
 It's it cute and I think it goes prefect with my Liberty scrabble tiles.

 Hope you get to spend time with family and friends today.
Pin It!

June 20, 2014

Snaps

Finally got around to doing some photo editing today. Some of these have been on the camera for a month or more. A couple I took today and one of my favorites snaps of Jessi is from last year.


Brent's Dad was here today and I took this shot while we were relaxing out back. This is the same Hibiscus that I had last year and we wintered over in the garage. When we brought it out for the summer it didn't have a leaf on it but it's now covered with blooms. Wonder if I can keep it until next year.


A snap of the pink Impatiens that I have in the middle of my table out back. I think they are so pretty.
Love the shade of pink but I don't like the mess they make on my table. Have to wash it off every time I go out to enjoy a cup of coffee.


I have been trying to get some good shots of the Grands that I can have printed and framed but it's hard to find time anymore. They are so busy with school, track, football, band, flag practice, (learning to drive) and just life in general that's hard to find a few minutes to spare there Grammy and her camera.


This was taken of Jess last summer at the beach and it's my favorite of her.


I got this one of Jason a couple of weeks ago when they came for a visit.


This one was snapped in May on our trip to Canaan Valley. Is it just me or does he look a little like Jimmy Dean......or maybe it's just that cool look he has going.


This is the way he normally looks. Phone in hand and smile on face.


A snap of a Brook Trout that Neal caught in Canaan .....yes my son bites his nails but the trout is pretty.
Pin It!

June 19, 2014

In Bloom

Am I lucky or what?  This beautiful flower bench was made by my multi-talented daughter-in-law.  We spent last weekend up there for Amanda's dance recital and I got to bring an early Christmas present home with me....Love, Love, Love it!


This is made out of a twin size bed and she even thought to put a mesh bottom in it for drainage.  It's covered on the inside with heavy burlap that will be replaceable as needed.  I can't thank her enough!
I'm thinking she could sell a ton of these!


Pin It!

June 6, 2014

Buttercups

I started to post this the other day and than didn't. Wasn't pleased with the image the wind was blowing just enough and I had my 70-300 lens on and I can't hold it still.......results image not as sharp as I would like. But I liked the colors.
Pin It!

June 5, 2014

Those poor Boxwoods are showing signs of life again!

I finally got around and trimmed these completely back.  As you can see, there is signs of green and each day, they get more and more little leaves on them.  I'm hoping by July to have them covered back in greenery but I'm sure they won't look as lush as they once were for a year or two.  I'm just glad to see the greenery on them...I so hated to see them die out.  They make a spray that you can apply before winter that will protect the leaves from the dry, cold winds.  I just might have to do some investigating and buy some before next winter. 


And just a shot of one of my pretty flower pots.  We had a 60% chance of huge hail and high winds on Tuesday night so I spent about an hour and a half moving all my pots inside the garage and covering the ones I could not move.  Luckily, we only got a bit of wind with some much needed rainfall.  It's cloudy here today and we have chances of rain now through Saturday.  The insurance adjuster was here for the house...ended up with around $29,000.00 in damages.  Not sure when we will get the new roof on...I've signed with a company but have not got a start date as of yet.  


Miss you!
Pin It!

May 8, 2014

The effects of a long, miserable Winter...

You don't really realize the effects a super cold, long winter has on the landscape until Spring arrives and things should be greening up.  This is just two of my dozens of boxwood's.  As you can see, the damage is beyond repair...I'm still holding out pulling them up for a while longer to see if anything greens up on them. Do not be fooled by those so called botanists that say you don't have to water established plants...they all need moisture, no matter how well established they are.  I believe if I'd watered my boxwood's before the cold winter set in, they would have survived...maybe not 100% but not to the point of damage that they are now. I've had these for over 20 years and hate to lose them. The Azalea that I babied for 3 seasons to get established took one hard winter to die!  My ornament pear trees look like they have developed a disease too...so they are coming down...I will not fight for their lovely white flowers any longer! I'm sure there is a better alternative for these disease trodden beauties. My Korean Lilac is blooming but the beautiful, full bush I had last year is just a memory cause its sparse in leaves this year.  I'll be cutting it way back after the blooms are gone to try and shape it back up into the beautiful lush bush it was last year.  Most of my Hosta survived but not all....the Shasta Daisy that I fought for years to get established is struggling to even get itself started and it should be 6 inches tall by now.  No matter how much you want it, fighting with Mother Nature is a never ending chore.  I'm getting too old to continue this fight and think I'll throw in the towel and admit defeat...the lawn won this battle!  Next week, I'll be feeling more optimistic and give it another fight! LOL and pray that Mother Nature is kind to me and brings me more rain this summer than it has the past 3 summers.

Wind Burned Boxwood's


Pin It!

May 4, 2014

Apple Cinnamon Muffins


Made these the other day and haven't had time to get it ready to post until this morning. They are just from a mix that I pick up at Aldi's but they are so good. Even better when they are still warm with a hot cup of coffee or tea. Little bits of dried apples and then topped with a cinnamon sugar crumble. Brent's Dad was here and he thought they were great.

Don't you love the tea towel that I used in this shot. Looks like vintage linen but I spotted these at Wal-mart and had to have them to use in what little dab of food photography I do. Or maybe I just like to collect food photography props.......I think the later.
Pin It!

April 21, 2014

Outside my window


I love seeing these quick moving little birds at my feeder but they normally don't stay still long enough for me to get a shot. He must have been extra hungry because he hung around long enough for me to grab my camera and snap a few quick shots. Luckily I had my zoom lens on but didn't have time to put it on my tripod and I have a hard time holding the camera still with this lens on and zoomed full out. Grabbed a chair and used the back of it for support.
Pin It!

April 14, 2014

The Last Sympathy Cards (for now....hopefully, I don't need anymore for a long while)

This is the last sympathy cards I made up...I just changed the colors on this one so I could have two cards but not send exactly alike.  The image is a file I bought from JustInklined. The images from here always print up nice and crisp.  I wanted it to look layered up on several layers so I took it into Studio Design and placed it on the top layer of my card...this way I knew how much to extend it out over all the layers so it would print on three layers of my card.  Once I figured out how big to print the image, it then was just a matter of downsizing each layer but leaving the image the same size.  I embossed the sentiment and the border on the top layer after I printed out the image. I then printed out two more layers with the image and started lining them all up and putting them together with foam tape.  This first one has three layers and I used yellow ribbon with black pearls. 


On this second image, I messed up the middle layer and didn't have time to re-do it.  So...I just added two layers instead of three...on this one I used white pearls and teal ribbon.  I like the colors of this one better but I like the three layers of the first card the most. 


Enjoy!


Pin It!

April 10, 2014

Sharing a few more cards

As you can see, I had a rash of Sympathy cards to make...I'm going to share 4 of them today...the last three are alike except I changed up the color of the blossoms and pearls.  Nothing much to share about these...I used embossing folders and cut the blossoms on the Cameo.  On the first card, the brush was by Katie Pertiet. I cut the butterfly with the Cameo and then added glitter to it.  I printed the sentiment on the velum and then cut the strip for the front of the card.  Layered it on some new cardstock I found by Bazzill called Bling...it has this linen look with a beautiful sheen to it.  I wish I'd picked up a lot more. The only difference between these two cards is the pearls and the color of the bottom layer.


As you can see...all I did was change up the colors and on the last one, I rounded the corners.  I was going after a frame/matted look for the sentiment..I can't emboss but I can fake it...LOL...I think the purple one is my favorite..if you look closely, you can see the beautiful sheen on the purple sentiment frame. And yes, they are all the same white...LOL...I still can't take pictures and get the exposure correct...

That's all for tonight...I've got a couple more Sympathy cards and then Gavin's birthday card...will share those this weekend.

Thanks for looking!

Pin It!

April 9, 2014

Card in a Box

I finally gave this technique a try....the first image is the first one I did and I wasn't real happy with it but the second card was more to my liking.  They were fun to design and I can see myself making more of them.  Might do one for Mother's Day...

On this image I used elements from a kit by Lori Whitlock called Maggie.  The paper is from Birthday Celebration...a collaboration by several different artists.  The box cut file was purchased from the Silhouette store.  The rhinestones were from a roll that Jerri Ann bought me for Christmas...first time I've used them...I'm a hoarder...can't get myself to use the really pretty stuff...LOL  Everything was traced and cut in the Cameo and then I added liquid pearls and glitter to the flowers. 

I liked this one much, much better...just more up my alley in colors and design.  Everything is from a kit called Little Charmer by Laurie Ann HGD. 

My last share today is a birthday card I made up for a friend of mine who turned 60...she is kind of a tom boy so I knew I couldn't do frilly and this is the best I could do...love the colors!


The red dotted paper is from a kit called Retro Red by Robin Sampson and the blue chevon paper is from a paper pack called Breezy Summer by My Clipart store. I added white pen stitching and ran my stars through my Xyron to add adhesive and then glittered them up.  The kraft card base is from PaperTrey Ink.  The sentiment is by Kolette Hall...I just changed the color and did a print and cut onto the oval shape. I cut the tag shape from kraft cardstock and then made a bit smaller size of the tag, cut it four times and layered it on top of each other with adhesive...then used it to emboss my larger tag shape.  That is one thing I wish the Cameo could do..emboss around a cut shape but it doesn't. 

That's all for now...if I don't get busy with a birthday card, it will be too late and my grandson will be cardless...LOL....this is the first year that I do not have to make any party stuff...he's finally outgrown the parties and is just having a few over night guest.  I kind of miss it! 

Thanks for looking!


Pin It!

April 4, 2014

Bunny Banner


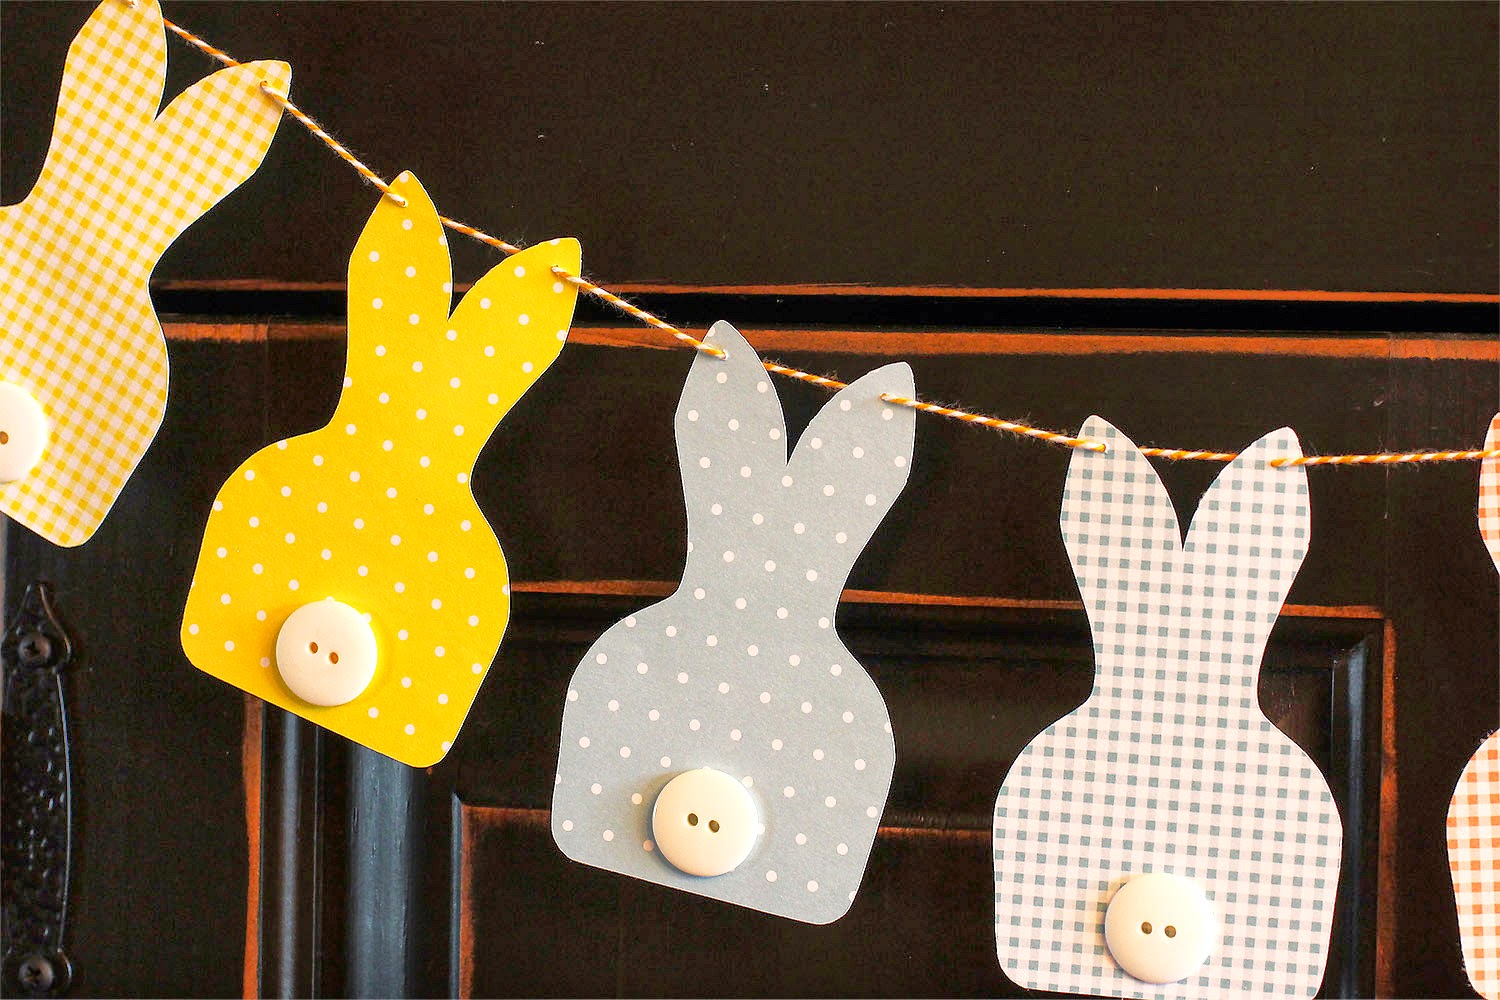
Saw a bunny banner some what like this on Pinterest but it was to buy on Etsy. I didn't want to pay for something this simple to make so I started looking around for a bunny silhouette that I liked that was similar. Found another one but didn't like because the ears were different so I just drew my own in Photoshop. After I finally got the pattern loaded into the Silhouette I cut them from some pastel cardstock that I had on hand. Didn't have any white pom-pom's and didn't want to try making any that small so I got out my collection of white pearl buttons and finally found 8 that was almost alike some shinny and some dull but I think they look great. Stung them together with some orange twine.
I haven't crafted anything for a long time and forgot how much fun it is.


If anyone wants the pattern let me know.
Pin It!

April 3, 2014

Cherry Upside Down Dessert

This is SO good.....I did change up the recipe just a bit....I used Wilderness Sugar Free Cherry Pie filling and it just looked like it was more juice than cherries so I added a can of unsweetened Tart Cherries in water that I drained first.  This just added more cherries to the pie filling and only added 6 calories to the dessert because I cut my 9 x 9 inch dessert into 9 servings instead of the 8 that Joanna cut hers. 

This is the cast of characters....almond extract, sugar-free cherry pie filling, reduced-calorie margarine, Heart Smart Bisquick mix, Splenda granular, fat-free half and half and slivered almonds...yum, yum....


It even made a very pretty dish before I baked it.


but once it came out of the oven and had that golden color, I wanted to dive in and eat it right then...I refrained and saved it for supper...Bill was in heaven, as cherries are his favorite fruit!


I will be remembering this dessert when I have to take something to a fish fry or BBQ....


Cherry Upside-Down Dessert
Serves 9

1 1/2 tsp. almond extract *
1 (20-ounce) can sugar-free cherry pie filling (I used Wilderness)
1 (20-ounce) can Tart Cherries in water, drained
1/4 cup reduced-calorie margarine * (I used Smart Balance)
1 1/2 cups reduced-fat biscuit baking mix (I used Heart Smart Bisquick)
3/4 cup Splenda Granular (if you use Splenda Blend, I think you could cut it down to 1/2 cup)
2/3 cup fat-free half & half
1/4 cup slivered almonds

Preheat oven to 350°. Spray a 9 x 9 inch baking dish with butter-flavored cooking spray.  In medium bowl combine cherry pie filling, drained tart cherries and 1/2 tsp. almond extract.  Evenly spoon into prepared baking dish.  Drop 4 tsp. margarine by 1/2 teaspoonful evenly over cherry-pie-filling mixture. In a large bowl, combine baking mix and Splenda. Add half & half, remaining 2 Tbs + 2 tsp. margarine and remaining 1 tsp. almond extract. Mix gently to combine. Spoon batter evenly over top. Sprinkle almonds evenly over all. Bake for 18 to 22 minutes. Plan pan on a wire rack and let set for at least 10 minutes. Divide into 9 servings.

189 calories, 7g fat, 3g Protein, 27g Carbohydrates, 366 mg Sodium, 53mg Calcium, 2g Fiber


Pin It!

April 2, 2014

March makes way for April

I had all intentions of posting this image around St. Pat's day but life got in the way, as usual!  So...even through it is the 2nd of April, I'm posting it anyway.  I loved this rock pot and there was a sign in the plant that said "Leprechaun Toes" ...its really baby tears but the idea was cute....and the sun shining on it all just called to be photographed. 


Pin It!

March 12, 2014

Only in Missouri

It was 68 degrees yesterday afternoon...73 the day before and last night we had high winds, rain, sheet and then snow....that is one thing this state is completely certain of...if you don't like our weather, just hang around a bit, it WILL change!  LOL....

So, I was sorting through some pictures and came across this one....figure I had it ready for the blog, but never posted it...if I did, I guess we will just have to re-visit it...LOL...

Enjoy!


Pin It!

LinkWithin

Related Posts Plugin for WordPress, Blogger...