Showing posts with label bling. Show all posts

April 9, 2014

Card in a Box

I finally gave this technique a try....the first image is the first one I did and I wasn't real happy with it but the second card was more to my liking.  They were fun to design and I can see myself making more of them.  Might do one for Mother's Day...

On this image I used elements from a kit by Lori Whitlock called Maggie.  The paper is from Birthday Celebration...a collaboration by several different artists.  The box cut file was purchased from the Silhouette store.  The rhinestones were from a roll that Jerri Ann bought me for Christmas...first time I've used them...I'm a hoarder...can't get myself to use the really pretty stuff...LOL  Everything was traced and cut in the Cameo and then I added liquid pearls and glitter to the flowers. 

I liked this one much, much better...just more up my alley in colors and design.  Everything is from a kit called Little Charmer by Laurie Ann HGD. 

My last share today is a birthday card I made up for a friend of mine who turned 60...she is kind of a tom boy so I knew I couldn't do frilly and this is the best I could do...love the colors!


The red dotted paper is from a kit called Retro Red by Robin Sampson and the blue chevon paper is from a paper pack called Breezy Summer by My Clipart store. I added white pen stitching and ran my stars through my Xyron to add adhesive and then glittered them up.  The kraft card base is from PaperTrey Ink.  The sentiment is by Kolette Hall...I just changed the color and did a print and cut onto the oval shape. I cut the tag shape from kraft cardstock and then made a bit smaller size of the tag, cut it four times and layered it on top of each other with adhesive...then used it to emboss my larger tag shape.  That is one thing I wish the Cameo could do..emboss around a cut shape but it doesn't. 

That's all for now...if I don't get busy with a birthday card, it will be too late and my grandson will be cardless...LOL....this is the first year that I do not have to make any party stuff...he's finally outgrown the parties and is just having a few over night guest.  I kind of miss it! 

Thanks for looking!


Pin It!

March 11, 2014

The Last of the Cards...now to get creating again!

This is it...the last of the cards I've made to date....I do have a project in the works but it will be a day or two before its completed...

The first two cards used the same papers, just a bit of changing up of the layering.  I'm not sure which I like better...the first or the second one.  I made the first one for my mom and was never completely satisfied with how it was turning out so when I made the second one for Rox, I changed up the papers a bit and really think I like it the best.  Not real, real happy with either of them.  It's funny how sometimes I absolutely love how a card turns out and other times I just can't put my finger on what I don't like and what needs to be changed.

Anyway, I used paper from Sweet Shoppe Designs called Free Spirit. The newsprint paper was in my patterns folder but not sure who the designer was. I download lots of free papers and those get separated from their designers pretty often.  I had purchased these charms by Tim Holtz a while back and the hummingbird was just perfect for this card...Mom loves her hummingbirds!  The flower cluster in the circle is by Katie Pertiet and the birdcage is from the Silhouette Store.  The tiny butterflies came in a kit and luckily, were the perfect size!  I made my card-base out of Rustic Creme from Papertrey Ink and then made the layers to add to the top by resizing the circle cut out on each layer...I wanted a matted picture frame look.  This was harder than you would think...LOL...or for me it was.  The flower cluster and the birdcage (with drop shadow) were printed onto the pink layer of paper, which meant I had to keep it white around the flower cluster and still keep it lined up with each additional circle layer.  As you can see, it worked but it took a few cuts to get it there.  The sentiment tag is one I made for Maxine's birthday tag assortment.  The font is Great Vibes.  A few pink pearls to the bottom and a bit of distress ink to the edges and a pink satin bow. 


On this one I changed the sentiment to be used as a get well or thinking of you type card.  I left the scallop circle off completely but I added cut out circles to the border stripe. This was easily done in SDE by opening the border strip, adding a circle under the first scallop and then doing a copy/paste until I had enough circles for every scallop...then I positioned the first circle directly under the left side scallop and positioned the right circle directly under the right side scallop.  Opened up the alignment tool and selected space horizontally...this put the circles directly under each of the scallops.  I then selected all the circles and did a duplicate below and lined that second set up above the bottom scallops. Selected all the circles and the border strip, right clicked and made compound path...perfect!


Again, I used the same papers from the Free Spirit kit but used a cream layer on the bottom, the green in the middle and the rose pattern on top.  I cut the border strip out of green (used the eye dropper tool to select a green out of the green pattern layer) and then filled the top border layer with a pink stripe out of the kit.  I sewed this on with cream colored thread.  I did not distress any on this card...I wanted to sew the white on the sentiment tag but didn't figure I could follow the design so just added some white fake stitching.  The butterflies were cut out of some glitter cardstock and doubled up with foam dots and added to the birdcage.  The bow is seam binding with a pearl glued to the center and I added a few small pearls around on the floral background.  The Rainbow font is Mardian Demo and the rest is just plain Arial.  

And the last one is from a card I shared before...the bedspread inspiration...I had the background left over.  It didn't emboss as well as I would have liked so I ended up printing out another one and re-embossing but I hated to throw this away.  So...I decided to use it for a thank you card.  I had watched this video on stamping a butterfly onto pattern paper and then cutting it out and I liked the look...just don't have any stamps to do it with...LOL...so, I found a butterfly cut file that I liked, gave it a black fill and then did a offset and deleted all the inside stuff. I know this doesn't make sense to you, but when you do an offset to something like this butterfly, it will off set all the 'holes' and around the outside edge.  I only wanted the base of the butterfly, not with all the 'holes', so I erased all the stuff on the inside.  Oh, wow...why can't I say what I did and make sense?  I need to do a pic tutorial so this makes sense.  Anyway, I filled the offset with purple, grouped both the black filled butterfly and the purple offset and told the program to just cut the outer edge.  I did a print and cut and came up with this butterfly....basically a stamped look on purple card stock...I couldn't find any purple pattern paper that I thought looked good behind the 'fake' stamp.  I then just added some glitter glue and let it dry.  Popped it up on the background, added a pretty purple ribbon and a Thank you tag.  I rounded the corners, layered it on black and then on the card base.  I love the black/gray white with the splash of color. Oh, yeah, notice that font?  I really like that Mrs. Blackfort!


That's all for now!  


Pin It!

February 21, 2014

Cards, Cards and more Cards.....

I knew I had gotten behind on posting the cards I make but didn't realize I'd got this far behind...I'll be sharing 15 cards today, as long as Blogger allows me to post that many in one post but if not, I guess it will have to be in more than one...

First up is a Birthday card. This was made way back the first of 2013 so trying to remember the particulars is next to impossible for this ole brain...LOL...I know the card stock is from Papertrey Ink and I drew the flowers and the greenery. I'm thinking the dandelion was a brush but not sure where I got it and the butterfly was cut on the Silhouette and I'm sure it and the label were files from the Silhouette Store...I wish I would remember to add a note to all my files but I don't!  Anyway, this was designed completely in the Silhouette software program and cut on the Cameo.


Next up....another birthday card, this one for my younger sister.  It was pretty simple and easy to make...probably had little time to do it in, is my guess...LOL...I used an embossing folder on the green panel, cut the butterflies on the cameo and then made the round tag and cut out of some paper I had on hand at the time.  Layered it up and added a ribbon bow...easy, easy, easy!


Are you bored yet?   Only 13 more to go!  This was another birthday card that I wanted to try out the technique of cutting out the front panel with a butterfly cut file and then cutting it again with pattern paper to layer it on top of the cutout.  I embossed the panel and added some pink cardstock underneath.  Rotated the sentiment down the side and then did a trace on the bicycle and did a print and cut with the Cameo.  After it was all cut out. I added Crystal lacquer to the metal part of the bicycle to make it shiny and then added a bit more to the flowers in the basket.  The bicycle file and papers are from Free Spirit by Krystal Hartley and Laurie Ann.  I really liked how this one turned out! I've added another image so you can see how I did the inside. 


Ok. on to card number 4!  Whew....another birthday...I don't make much of anything else!  This too used a digital kit that I traced and then did a print and cut...the dollies and bird on the vine came from this kit but at the moment I can not find it. The butterfly came from a kit by Lauri Ann called April Showers.  I'm thinking she is the artist for the bird too but will have to check on that more.  The dollies and bird are printed onto the scallop panel and then I traced just the bird and cut it again out of the teal stock and layered it on top.  Added some pretty dotted paper, teal ribbon and a wooden button.  I'm sure the saying came from the same kit as the dollies...


Oh, my....this is starting to bore me...I can imagine what it is doing to you...at least its not a birthday card...its a Father's Day card instead...I really like using the Cameo to cut out panels and then layer behind them.  It just adds something special to the card.  This is one of the first times I actually thought about rounding my corners.  I usually forget until I've got it all layered up and then you can't use the corner rounder.  The stars were something I picked up in the clearance aisle at Wally World.  It's funny about that font in my greeting....I was just typing in the greeting and the phone rang...I answered, talked for quite a while and came back to the card and printed it off....never even changed the font from the default font...didn't even notice till I had it all assembled and thought...that doesn't look the best!  Oh, well...I'm not starting over!  Kraft stock from Papertrey Ink and the blue is just some AC stock.  A little twine and called it good!


Have I posted the card I sent you yet?  I'm thinking it was this one but I could be so wrong!  I do good to remember who I made a card for this week and which one it was....LOL...my friend Max got to see her card on the blog and I'd already forgot it was the one I made for her...by the time I hit 70, I won't know where I live!

Anyway, this card was simply made with circles that I filled in SDE and then cut them on the Cameo.  Cut out and layered up some flowers because I wanted them to be thicker like chipboard elements and then used my markers to color the edges to match the paper.   This card is pretty self explanatory!


This is my least favorite of all the cards I've done....I had this thought in my head that didn't come out as good as I envisioned and it took more time than any card I've done...I wanted the vase to look like it was filled with water and the stems were in the water behind the glass.  I wish I could say it worked but it really didn't.  Just looks like I parted the water and laid the stems in the gap.  Flowers were cut files from Silhouette, filled with pattern paper and then cut and layered up with buttons and twine.  Embossed the back panel wit dots and tied on a pretty gingham ribbon.


Halfway there....this is another card I made with the free kit I got in my card making magazine from Hunky Dory...called Flutterbye Wishes....I'm anxious to get this months kit cause we are suppose to get another free kit from Hunky Dory again...I really love them.  Every thing was from the kit except for the scalloped card base and I made that with the Silhouette.  Added a few rhinestones and a beautiful card was completed. 


Still with me?  I sure hope so! I'd been wanting to try one of these cards for quite some time and finally broke down and bought some of the clear cardstock from PaperTrey Ink...loved how it turned out but it was terribly hard to photograph so you could see the clear part.  The girl, tag, clouds, fence and butterflies are on the front of the clear stock card and then the scenery is printed on cardstock and attached to the top of the clear stock.  I scored the clear stock about an inch down from the top and then the scenery was fitted into the fold and the clear stock was glued on the back side.  I added another label to the inside on the scenery for the inside message and its hidden behind the front label.  It looks so much prettier in real life!  Rolled flowers, ribbon, rhinestones and glitter and then a bit of distress inks around the edges...I have to laugh...looking at it here, it looks like she is riding a bike with a flat front tire!


Another card I tried using the clear stock.  The white chevron was cut on the Silhouette and attached to the front of the clear stock.  The balloons and wish were cut files that I filled and cut on the cameo and then I just added pink cardstock to the inside. On this one, I had to do a whole cardstock card (out of the pink) so I would have a place to write the inside message...otherwise, it would have shown on the front and I wouldn't have liked that look!  Not the prettiest card but it was ok! This card shows why I prefer to cut my files out of colored stock.....I do not like white edges and I forgot to color the edges of the Wish with my markers..


I'd better put it in high gear...Bill is hollering for supper!  Ok...a card that started out as a birthday card and ended up a Sympathy card....didn't even have a need at the time but didn't think it looked too festive for a birthday card either.  This was a new technique I'd learned how to do by making a swing card. The paper is Every Day Kraft by the Paper Studio.  Some ribbon, a bit of Liquid Pearl on the flower, some black dots and a sentiment...I need to make up a few of these to keep on hand.The flower stamp came from Kerri Bradford.


Onward.....we are getting closer! Only 4 more to go today!  Not that I'm caught up but it will be all for this post.  This was made for my beautiful, sweet daughter.  It wasn't my idea, I found it on Pinterest and had to see if I could re-create it with the Silhouette.  The original poster had used a die but I don't own any so had to make my own cut in SDE. The cut file wasn't too hard to make but it was a bugger to figure out how to get it mounted to the front oft the card.  I finally just cut stripes of foam tape as narrow as I could so it wouldn't show behind the 'wire'...the butterfly is a Silhouette cut file and I used some new glimmer paper stock that I got from PaperTrey Ink...love the shine it has...both the white and the blue are glimmer papers. The yellow is plain.  She loved it, of course! 


I'm sure you are aware that August is a busy birthday month for me....Greg, Jack, Bella and Jerri Ann and then Bill and my anniversary....I had to have all these done before the grands came for their summer visit which falls during the first of the month.  This one coming up was for Bella....she is a cowgirl at heart...loves riding horses whenever she gets the chance.  The kit is called GiddyUp Cowgirl by Carta Bella...love this kit and have used it twice now....All I did was use the paper for fills on my shapes and layered it all up.  The tag came from the kit...I made the scallops and the horse/cowgirl shape, I have no idea!  I'm sure it was a cut file but I can't find it in the library so I don't think it was from Silhouette but it could be an svg file.  Again...I need to add notes to my files!  A little ribbon, a pretty pink resin flower and some fake stitching...


Next for the month was Greg, one of my hardest cards to come up with...I like pink and frill...not boring and manly...nothing spectacular....just cut some pattern paper and layered it on with an added button...


And the last card I will share today....birthday card for dear Jack...love doing cards for little ones...
The puppy and balloons are cut files from Rivka's Renditions and was purchased through the Silhouette Store.  Embossed the background with a large dot embossing folder, layered the pup and added the balloons and some colored twine for the strings.  I just cut a few 7's from cardstock and added them around the base.


That's all for now....hope you didn't go to sleep before you made it through....I hope to post the rest of them next week....about a dozen more to go!

Enjoy,

Pin It!

December 9, 2013

From Our Home to Yours....Merry Christmas!


Trust me...my photography does not do my beautiful lights any justice!  I've tried two nights now and still can't get them shot as pretty as they are...I got my love for Christmas lights from my father....I just might have to drag some of his lights out and put some up...he hasn't put any up for a few years now.

Don't forget to scroll down...I posted yesterday too...see you in a week!

Pin It!

November 7, 2012

Halloween Projects (finally)

I know its a week after Halloween but I'm so slow and I am a world class procrastinator!  Anyway, first up is the treats I made up for the grands up north.


The sliding boxes are for the girls and they have necklaces inside of them.  The poison jar is for Jack and its full of candy and then each one of them got a Hershey bar wrapped with a skeleton.  The poison jar is a cut file called Toil and Trouble from SVG cuts.  It was a bear to assemble but once I made this one, the second one was much easier.  I think all the images are cut files from the Silhouette store. The paper is mostly from Echo Park (I think). The skeleton came in pieces that you cut out and put together with brads but I welded them together instead...didn't want to brad 44 of them...LOL...the label on the wrapper was bought from the Silhouette store but I had to do some massive re-working of it to get it to print and cut nice.  The first print and cut was jagged and uneven.  I re-worked the borders around it and once I'd done that, it printed out perfectly and cut exactly on the lines.  The girls loved their boxes...mom took one to work and her co-workers are wanting to buy some but I don't think I want to do it for money....like doing it for fun instead!
I found out, with the Potion Jar cut file. that I had to set my blade pretty high so it just barely scored the score lines.  If not, it actually was cutting through the cardstock and I did not like that look.  I did an ungroup and ungrouped the score lines from the cut lines...fed the cardstock through the cutter twice, once to cut and then once to score, changing the height of my blade for each pass.  The second jar that I made for Gavin came out much better.

This next image is of the Potion Jar I made for Gavin and a card I made for my friend.  I ended up making 44 of the skeleton bars...20 for Gavin's class, 15 for Jerri Ann's co-workers and the rest for me to give to friends of mine.


and a close up of the three projects.


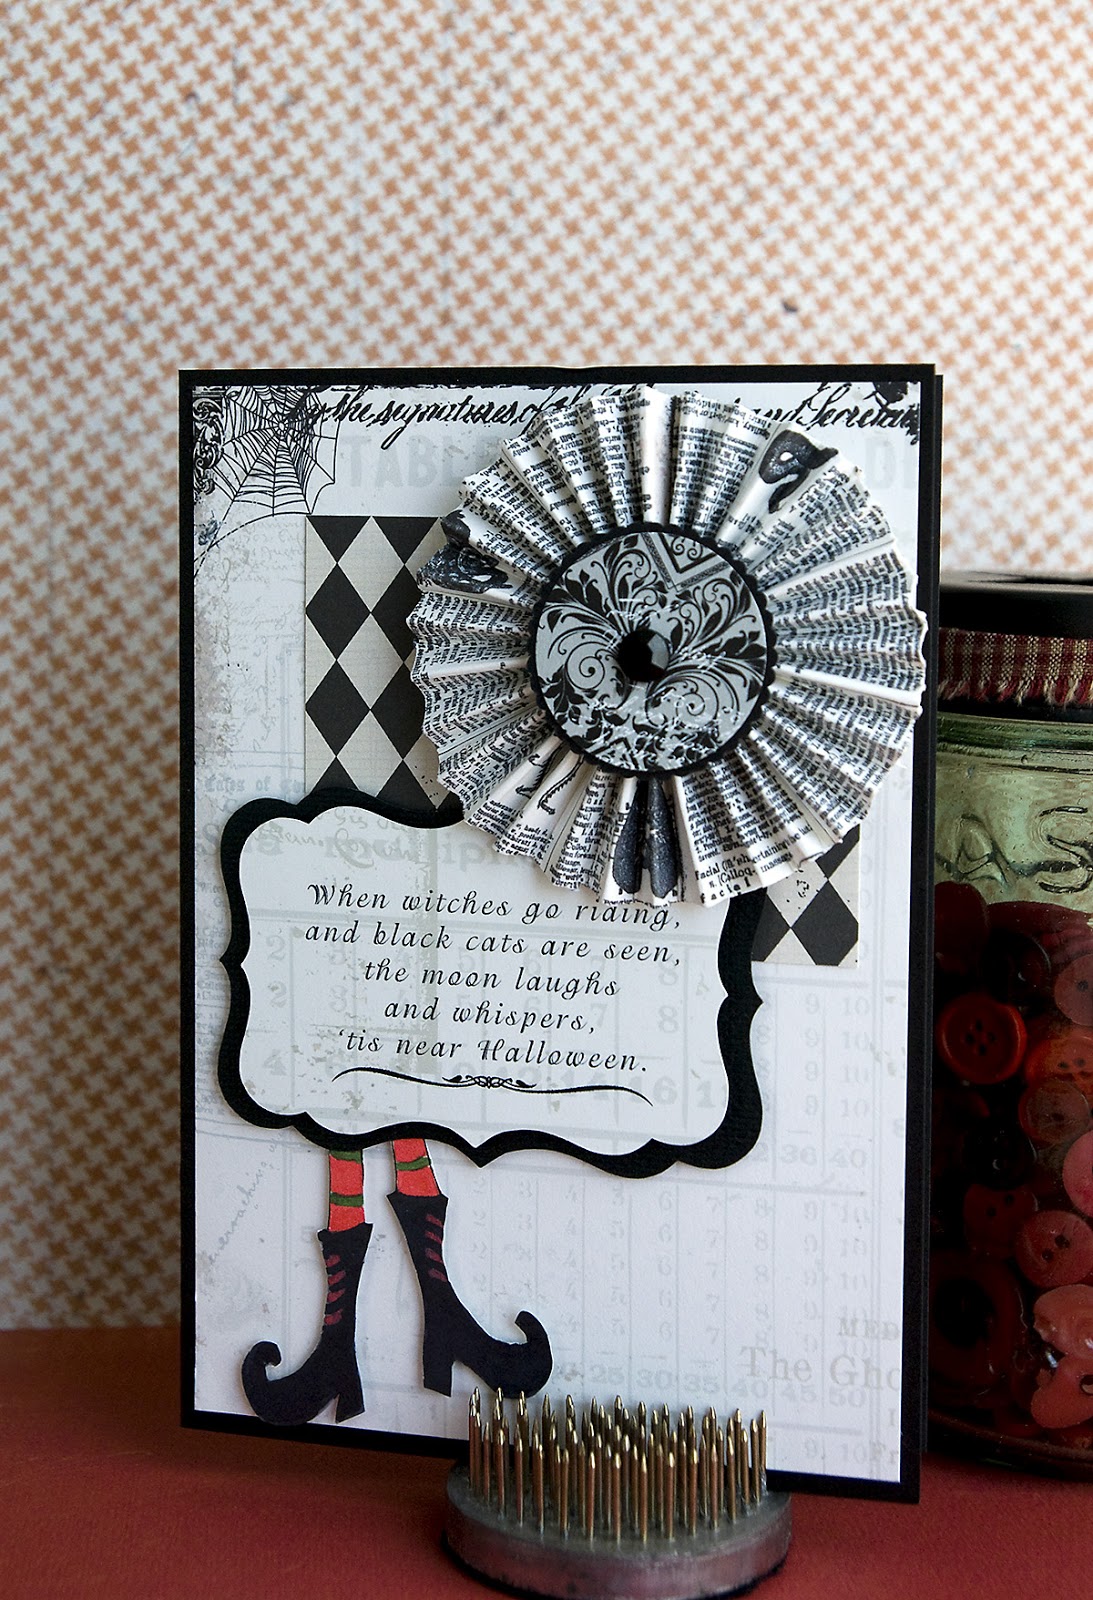
I had to draw my own boots....couldn't find any that I liked. I just drew them on paper and then colored them and cut them out. Don't look real close...my cutting was not too good and my boots are different sizes....LOL..


I made this label with stuff off the internet...bird, the skull was a font and so was the swirl at the bottom.  Printed off on white stock, aged with distress ink and mounted on black.  The spider web was a cut file from the Silhouette store. They were running all their Halloween files at 75¢ so I bought quite a few.  This was one month when I should have paid the monthly fee of 9.99 but didn't!


I welded the skeleton together, then off set him so I could have the black background and ran him though my Xyron to apply adhesive.  Gavin stuck him to the background and he did a really good job!  Used paper from Echo Park the Apothecary Emporium. I had a 6 x 6 pad of this paper but you can buy it from Jessica Sprague as digital plus the kit for the label. This is the label I had to re-work to get it to print and cut properly. 

And this little guy?  Well, it would be Gavin back in the stone age...Jerri Ann and I made the costume.


and last...I needed a birthday gift for my beautician.  She is a cowgirl at heart so I wanted to do something along that line.  I got this idea from Lisa Johnson


I found a horse font, used paper that I printed off from Albums2Remember by Barb called Summer Fun and used a cut file for the stars.  I was running late for my appointment (on her birthday) so had to hurry up and write the inside message by hand...LOL..

That's all for now!  Going for my walk and then work on a birthday card.

....
Pin It!

LinkWithin

Related Posts Plugin for WordPress, Blogger...