February 24, 2012

Second post today....I'm on a roll...

edited to add:  I was wrong...this is NOT cross stitch, it is embroidery.  I don't know one stitch from the other...LOL....I do but just wasn't thinking on this one.

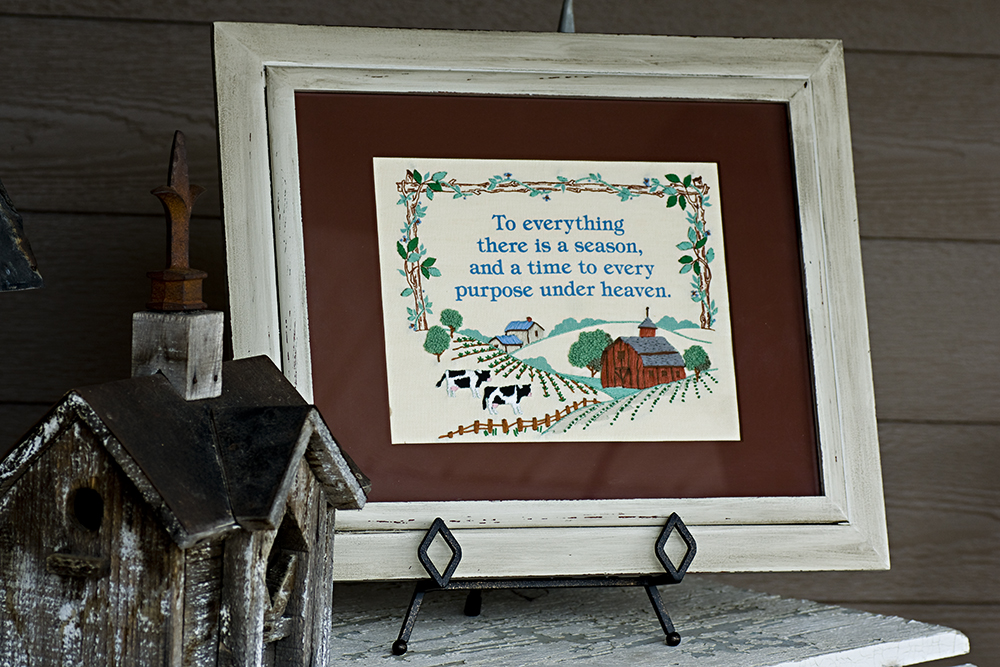
Some days I just have more to post then others...LOL...now I'll go a week or two with nothing!  This is the cross stitch my mother did years ago...I wish the saying would have been in cross stitch too but I can't change that!  She had it in just an old metal frame and my sister wanted it.  I brought it home to frame and mat and really like how this turned out.  It was originally a red-ish stain colored frame with a cream mat.  I painted the mat with a foam brush and a mix of Barn Red & Nutmeg brown craft paint.  I was going for a match for the barn and came close...I think I needed to add a bit more of the red.  Took 3 coats to cover it nicely.  Then I spray painted the frame (no sanding but probably should have) with a cream colored satin.  Gave it three coats and then let it dry completely.  After drying, I lightly sanded some of the paint off so the stain would show through. Next, I wiped on some Antique Glaze that I bought from Lowes, let it dry a bit and then wiped some of it off.

Because of the barn setting, I was going for a rustic kind of look  that would highlight the scene.   The only thing I would change would be the glass...in my opinion, it would look much nicer if the glass were non-glare but this is the glass that came in the frame and I wasn't wanting to spend any money.  All I had to purchase was the cream spray paint as I didn't have any except for gloss and I knew I did not want it shiny.
So, she will have to replace the glass...LOL

I hope she likes it...I know I do!

...
Pin It!

February Birthday

I sure wish I could capture my images true to life...I tried everything on this and this is as close as I got...its close but still not there. 

This is my own designed card and I think I like it.  I really love this color combination. The card base is just white cardstock, the brown is some paper from Colorbok that I picked up at Wal-Mart.  The blue plaid and dotted is by Tracy Ann design from her Avalon paper kit.  I bought 4 of her paper kits off her ebay site and really like them...I printed them off with the plaid on one side and the dotted on the other on Neehah Linen stock and they are SO nice.  I plan on buying some more.  Ok, back to the card...the oval is Neehah Linen and ran through my Cuttle Bug with an embossing folder and then I used some of Jim Holtz distress ink Walnut to 'color' the embossed swirls.  The buttons and bow are from Wal-mart and the Rustic creme button twine is from PaperTrey Ink.  I need to order the Rustic Jute...need some darker, some times.  The tag I made myself in CS4...forgot what the name of the font is.  I made the dotted circle around it, added a shape and put a rhinestone in the middle of the shape and then cut it out with my 1 1/2 inch circle punch.  I don't have many punches, just a couple circle ones and an oval one.  Oh, that reminds me..the ovals were cut on the Cricut using SCAL...I just made them a bit different in size so I could mat them.  The scallops on the bottom were also cut with SCAL on the Cricut and I made them by joining some circles with a rectangle.  Easy as pie! I'm really liking SCAL and hope it works ok with the Silhouette.  The sewing is with my white paint pen and of course, is hand stitched....LOL.  I think that is all....the inside was just some white copy paper attached with double stick tape.  Again...I forgot the logo on the back...I'm getting pretty good at hand printing it.

....
Pin It!

February 23, 2012

March Subway Art


Here's my March Subway Art. Just click and copy.

Would you believe I got up this morning with a sore thrroat and a cold. Feel nasty.

For the shamrock bouquet I copied Rebecca's adorable bouquet link. I used some digital scrapbook paper from One little bird at Oscraps and Digital Design Essentials. Added the words used in my subway art to one of the papers and the green is just a green fill. Printed each of these out as a 4 x 4 square and cut the shamrock shape out on the silhouette machine. Turned out pretty cute (I think) just wish I could have found those fantastic green doors that Rebecca used as a backdrop for her St. Patrick's Day banner. Love them!

Think I will save the scraps of paper after cutting the shamrock's. Maybe I can find something to do with them. 

Pin It!

February 22, 2012

Belated Birthday


Remember the card I said I needed to make for a friend?  Well, as you can see it is late...really late.  Her birthday was last Friday and I'm just now getting it in the mail box.

I have had these little bird dies for a long time.  I was buying paper from PaperTrey Ink and needed just a bit more to hit my free shipping.  I'd been seeing these little guys on cards and fell in love with them.  With a bit of shapes, I'm sure I could have created them on the Cricut but this is so much easier...LOL..just a turn of the crank on the Cuttlebug and they were cut.  You get 4 sizes on the die and they all cut at once but they are so tiny, it doesn't take much paper and now I have more birds to use on another card.

I would like to say I 'cased' this card but truthfully, it was a copy...I just don't do good at designing but I know what I like when I see it.  The original card was made by Elena from just Me.  Her birthday card was on time...lol.

I had these 6.5 x 3.5 size envelopes and wanted to use them, so this card is a 6.25 x 3.25 size.  I used the kraft PaperTrey Ink cardstock for the base, the white banner is just some I had in stash.  I rounded the corners of the banner with my Corner Chomper and then hand stitched with my black pen...I print better than I sew...LOL.  The ribbon is some brown twill I picked up at Wal-Mart and the birds are made out of colored cardstock that I bought there as well.  I die cut the birds and used the next to the biggest size for the body and the smallest bird, I cut the tail off and used for the wing. I used a brown colored pencil to outline the bird ( I need to practice this more) and a black colored pencil to make the eye.  The font used for the saying was AL Featherbrain and Plantagenet Cherokee.  I glued the banner on with double stick tape, used Scor Tape to attach the ribbon after I tied a knot in the end and cut it off even with the edge of the card.  The bird wings are attached with tiny dimensionals and then attached to the banner with mini glue dots.  The birthday hat I hand cut and then used green/black colored pencil to add the decoration and it was attached with another mini glue dot.  The inside of the card says, " ...unfortunately, he told me late. Hope it was happy!"  I printed it on some cream copy paper and attached with double stick tape to the inside.  Again...I forgot to add my logo on the back and now its too late.  I'm thinking I could use a logo stamp... I just added feet with my black micron pen.  They needed to be grounded!

Hope the remodeling is coming along nicely...I miss you!

....
Pin It!

February 20, 2012

I'm SO ready for Spring

And its been a super nice winter but I'm ready to see some green grass and some lovely color.  I was on my walk last week and had my camera.....its so sad passing by my neighborhood greenhouse...it looks completely neglected.  Its not, of course; if you go further back on the property you can see the beginnings of Spring in the greenhouses.  I noticed yesterday that they have moved the hanging pots to the front greenhouse.  You can't see the plants in them yet but you can see the pots.  I'm going to have to remember to take my camera with me so I can document their progress.  I'm sure we will be seeing color on them soon.


Kind of looks like they just locked up and went south for the winter, doesn't it?  It won't be long now and the tables will be full and the carts in business!

And this is the only color I could find on my walk....


Bring on SPRING!!

...
Pin It!

February 17, 2012

Making Dishwasher Detergent

A while back, I came across a recipe to make your own dishwasher detergent and decided to give it a try.  So now I'm going to give my opinion on this recipe.  It called for Borax, Arm & Hammer Washing Soda, Kosher Salt and Citric Acid. I found that it didn't clean my dishes as well as my Cascade does and it sticks together really bad.  I shake it every day but it still forms a solid block.  I'm sure the Citric Acid is the reason it sticks together, so I added some rice to it this morning to see if it will absorb some of the moisture.  I'll let you know how that works but in my mind, I'll probably go back to Cascade and just add some Borax and Soda to it to make it go further.

Just saving someone the trouble of making this recipe and being disappointed like I was. The Citric Acid is not cheap...I gave 3.99 for a small salt shaker size bottle.  I'm thinking I could buy a lot of Cascade for that price....LOL

This reminds me of the time I searched and searched for a way to remove the water spots off  Bill's shower doors.  I tried everything imaginable and it did finally come off but only after my hands were raw!  LOL....I'd read these reviews about how it worked like magic and give that a try and it would only slightly fade the spots. Then I'd read another product and give that a try...I really think I added so many chemicals to the doors that it just ran away....LOL

What I've found to get it off now is simply changing the soap that he uses...instead of bar soap, he now uses liquid soap and the soap scrum and water spots are now a thing of the past or at least minimal. Hopefully, next year, we will get that bathroom remodeled and the doors will be new, bright and spot free!
Pin It!

February 16, 2012

Man Birthday Card

Just finished this up in the nick of time again.....birthday is tomorrow but I want to give it to him tonight at Gavin's ballgame.  I saw  this card on Pinterest and liked the ruler idea and decided to use it on my card. The red circles designate his age...wonder if he'll get that?  Hum....

All the paper is digital that I printed off, except for the solid brown and that was in my paper stash.  Let's see...the dotted background paper is by Kim Hill in her Memory Lane Paper Pack. The blue stripe is by Gina Cabrera from her Shabby Prince kit and the numbers paper is by her also, from her Book Bag kit. The ruler was from the kit called A Guy Thing but I have no information with it as to who made the kit or where I got it.  The printed paper behind the sentiment is by Meryl Bartho from her As Time Goes By kit. 

This card is a 5 x 7 top fold that I made out of some 11 x 17 inch cardstock I've had for ages. It's not real heavy so makes it great for layering up without giving the card too much bulk. I glued the dotted paper to the front of my card and then just added the blue stripe on top of that. The numbers paper was inked on the edges and the brown cardstock was distressed using my scissors and then glued together and then mounted on the blue layer.  The ruler was printed out 5 times and then cut and all glued together to give it a real ruler feel.  Then I cut o's on the Cricut, glued two together to thicken them and the added to the ruler with glue dots. I had the starburst circle in my  Scrapping Table files and cut it with SCAL on my Cricut.  I then cut a circle to fit over that and printed the sentiment like I did before where I printed it off on my cardstock, cut a circle with scrap paper on the Cricut and then 'slid' the printed stock under the circle on the mat and did a re-cut...I know this doesn't make sense and no, I forgot to take pictures.  Just need to do this someday to show you how I do it.  Ok, back to the card.....I then inked up the circle and the starburst and used dimensionals to attach the two together and then used more dimensional's to add the sentiment tag to the front of the card.  I then printed out "Celebrating" onto some more of the cream cardstock and just cut it out by hand and made it look like a banner by tail cutting the ends. I curled it a bit with a pencil and then attached it to the tag with one glue dot on the end that was laying down.  Added some brown buttons and that's it....printed a saying on cream colored typing paper and glued to the inside. 

Now, I've got to get busy on a girl card....her's is tomorrow too but it might be a bit late...


...
Pin It!

February 15, 2012

Remodeling going on


Getting some remodeling done around here and it's long over due. Having all the rooms in the house painted and that includes the garage and the sunroom ceiling. They finished the new floor in the bathroom and installed a new toilet on Saturday. I'm also having a tile backsplash put back in the kitchen. I took the old one done when we put in the new kitchen 20years ago and I've been sorry every since.
I have always done all the painting (with Brent's help) around here and I just can't get down and crawl around like a kid anymore. Brent hates to paint as much as I do. So we said no more we will gladly pay someone that likes to do that kind of work. I always make a mess anyway.
Pin It!

February 11, 2012

Valentine paint cans for the Grands


Not a very good image but it was the best I could get today. If I'm going to get into making this kind of items and cards I need to buy some supplies. The only paper I bought for this was the
pink with the hearts the rest was just some 8x8's that I had on hand and it was to short to go around the pails. So I had to piece the scallops together. Not my proudest project but the Grands won't care. I did design and cut the money card holder,scallop border and circles in my Silhouette SD. It does cut nice. I don't like do the score lines with it so did them by hand.
I had fun and I will do more. Cards.....Yes I think I might like to give them a try.


Pin It!

February 10, 2012

Tutorial for Puppy Card

And now to the fun card....isn't this puppy adorable.
I bought this kit from Kate Hatfield and its called My Kinda Dog.  It has 16 different dogs and I can see it being used a bunch more times for the little men in our family. This cutie is called ScruffyCross.

The base of the card is cut out of 8 ½ x 11 Perfect Match Pure Poppy Cardstock by PaperTrey Ink.  It was cut at 5.5 inches and then scored at 4.25. The extra card was filed for future use. I then used Neehah Solar White Linen for the card front and it was cut at 5.25 x 4.  My grey dots paper is from Shabby Princess but I can't remember exactly which kit it is from. I desaturated the color to get this grey dotted paper and then just hand cut it into triangle banners.  I used red embroidery floss and just wrapped it around the corner of the white card front at the top, left hand corner.  Adhered it to the back with scotch tape. I then added the banners with glue dots. This didn't work out quite as good as I thought it might but I just felt like the front needed something besides the puppy.

Ok, now to the puppy.  The puppy is cut at the size of the element. I did not shrink or enlarge it. According to the file size, it is 3.45 x 4.597.  I placed 4 puppies on each sheet of cardstock and printed them out twice.  I know, I could have saved some stock here but I first thought I'd only cut it 4 times but decided on 5 times in the end.  When I printed my second sheet, I just printed one copy of the puppy. Now, I started cutting. I cut by hand and the first puppy was cut fully. The second puppy was cut all but the tail...meaning I cut the tail off and threw it away. On the third cut, I cut off the back legs.  Are you still with me?  LOL...on the 4th cut, I cut only the ears and head.  Now, once I got to this point, I decided I wanted the nose to stand out and the ears, so I cut just the nose and ears out of the 5th printing.  Once I had them all cut out (I must have liked cutting stuff as a kid cause I still love to do it) I started layering them.  The whole puppy is the bottom layer and the layer without a tail is adhered to the bottom layer with small pop dots.  You want to add dimension but not lots so I use the smallest dots...probably only 1/8 inch thick or smaller.  Adhere the third layer, which is the one without any back legs. The 4th layer is only his face and ears and the last layer is the ears and nose. Still with me? I curled the tail a bit with my fingers to 'fluff' it up and then I added Crystal Lacquer to his nose to give it a wet,puppy dog look.

The whole puppy was adhered to the card front with a glue runner and then the red heart (cut on the Cricut at 2 inches from Perfect Match Pure Poppy cardstock from PaperTrey Ink). was attached under his mouth with a glue dot. I added the sentiment and the stitching to the heart with my white gel pen and then used a fine black marker to add the stitching around the card front, skipping where the banner ran along the edge.

I hope this explains it all but if not, just post a comment and I'll try and answer better. 
Pin It!

Tutorial for the Red Heart Card

I started with an 8 ½ x 11 Basics Kraft Cardstock from PaperTrey Ink. Cut it in half at 5.5 and then scored it at 4.25.  This gave me two cards to work with, measuring 5.5 x 4.25.  I then cut a piece of Pure Poppy Perfect Match cardstock at 4.25 x 2 and adhered it with a glue runner on the left hand side.  The stitching on the Pure Poppy is a white gel pen and I just 'stitched' around the edge. Super easy and quicker then using the sewing machine. The heart was cut out of Raspberry Fizz Mix Patterned Paper Collection by PaperTrey Ink. It was cut at 4 inches on the Cricut, using the Plantin SchoolBook cartridge. I then cut the white heart out of Neehah Solar White Linen stock at 4.25 using the same heart from the Plantin Schoolbook cartridge.

Next I wrapped Rustic Cream Button Twine from PaperTrey ink around the heart and just tied a knot at the middle of the front and trimmed the ends.  From here, I used Pop Dots to place the flowered heart on top of the white heart. Then I used a glue runner to place both hearts on the front of the card. I'm not completely sure but I believe the buttons came from PaperTrey Ink also and were their Pure Poppy collection.

I used my dictionary to scan the Valentine definition into my computer...you can tell by the dark edge on the left that it was in the 'fold' of the book...I'd like to have not had this dark edge but was not going to tear the page out of the dictionary to scan it...need to find me an old dictionary that I can do that with...I then printed this out and cut the Valentine definition out into a strip and banner cut the end.  I used some Distress ink from Tim Holtz called old paper on the edges along with some dark walnut. I slipped the banner under the twine and added a small pop dot under the banner beside the twine.  This adhered the banner but still allowed me to curve the ends up.

I finished with three more of the Pure Poppy buttons that I attached with tiny glue dots and then used my corner chomper at 1/4 inch to round the corners.

I love all the products I've bought from PaperTrey Ink because they go together so well.  You can buy ribbon, buttons and paper in one collection and they match up perfectly.  I could spend a fortune at this site.  The cardstock is the best cardstock for cards I've seen besides the Neehah and the colors are just awesome.

Pin It!

Tutorial to Make the 3 heart card

For this card I used Neehah Solar White Linen cardstock.  I cut it at 5.5 x 4.25, leaving me two cards to work with. I usually save my extra card bases in a file for future use. I then used So So Sweet from the Paper Studio for the pattered paper.  I pick up paper packs whenever I go to the city that I think I 'might' use in my cards.  This was a 75 sheet pack of 4.5 x 6.5 papers.  This tiny heart sheet had the glitter already on it. You can't see it in the picture but one heart in each row is glittered. I used my corner chomper to round the corners and then added the white ribbon and stuck it down on the back with tape. This was then adhered to the card base with a glue runner.

Next, I started working on the sentiment tag. First I worked up my sentiment on the computer using Photo Shop CS4.  The font used for Valentine was Mr. Sheffield on its own layer. I then added another text layer to type the BE MY but I don't remember the font name. I didn't save this information and I probably didn't even pay attention to the font name. I just typed the BE MY above the V of the Valentine and scrolled through my fonts until I found one that looked good above the V. I remember finding one I liked and then I changed the leading (I believe this is the word) so that the letters were a little closer together. From here, I printed this out on plain paper and then I used removable tape to place my 4.5 x 6.5 piece of pink cardstock on top of the printed out sentiment. This pink cardstock came from the same pack of SO SO Sweet.  Then I ran both sheets back through the printer to print the sentiment onto the pink stock. I've used this technique quite a few times when I wanted something printed on small pieces that wouldn't go through my printer by themselves.  Kind of like printing a border design on the flap of a envelope where you tape the envelope to the paper or fold the flap over the top edge of the paper.  I know this isn't making sense but I'm not good at tutorials...better at showing not telling...LOL

Now comes the tricky part. I used an oval from the Plantin Schoolbook Cricut cartridge but could have done this in SCAL too.  I cut the white oval at 2.5 inches and set it aside.  Then I loaded some plain paper back into the Cricut and cut an oval at 2.25.  I left the paper on the mat and very carefully, lifted the paper off the mat (why holding down the top corner so my oval stencil would remain in the exact same spot on the mat) and slid my pink paper with the sentiment on it under the oval stencil. This is easier if you cut the sentiment down to say, a 3 x 3 square. It's just easier to get it slid under your 'stencil' and lined up under it.  After I got my sentiment lined up under the paper paper and it was stuck down good to my mat, I removed the white paper and loaded my mat back into the Cricut and told it to cut the oval at 2.25.  It then re-cut exactly where the original oval had been cut with the white paper and my sentiment was lined up perfectly.  Well, perfect for me, that is...LOL

I then adhered the pink oval with sentiment onto my white oval that I had set aside with a glue runner and again used my white gel pen to 'stitch' around the pink oval. Then my sentiment tag was attached to the front of my card on top of the ribbon.

The hearts were cut out of some purple stock that I've had forever and probably just picked up at Wal-mart.  I believe they were cut at 2 inches and I used the Plantin Schoolbook cartridge but again, this could have been done in SCAL. I then ran the hearts through my Xyron 500 using Acid-free Permanent adhesive (I think Brenda bought this machine for me for Christmas one year) with the adhesive going on the colored side of the cardstock. I did this so I could glitter them up.  I used some fine white glitter and just covered the whole heart. I had to use tweezers to hang onto the hearts and if you look real close you can tell where I hung on as there is no glitter at the bottom tips. If I had a glue pen, I could have added some more glue and then added more glitter but it doesn't show that much. From here, I added some buttons from my button collection with glue dots. The middle heart is adhered to the front of the card with a glue runner and the top and bottom hearts are adhered with pop dots to add depth to the card front.

Last, I added three rhinestones that I received from Cardmaking and Papercraft magazine that I subscribe to.  I love this magazine because of its tutorials and you always get a free gift with each magazine.  The only stamps I own have come from this magazine and these rhinestones were a gift as well. It is different with each magazine (it comes 6 times a year).

Also, I rounded the corners with the corner chomper at 1/4 inch.
Pin It!

February 9, 2012

Valentine's for the Grands


I had trouble with this one at first...just couldn't get a layout  I liked.  Finally just tossed all the elements on the top of the card and liked how they laid.  LOL...sometimes my creativity comes in strange ways.  I had so much fun, really, with all these cards.  They were just fun to make up.  Now, if I knew how to use all my machines better, they would come together a lot easier.  I broke the Grand Calibur and its same as new...didn't realize you couldn't use the CuttleBug emboss folders without a special plate.  I called the company and they will repair it for $25.00 plus the cost of my shipping.  Guess that is better than paying out another $140 for a new machine. 


This one just went together like butter on bread.  I realized, as I was trying to figure out how to run my scanner, that the machine was over 15 years old.  Still works like a charm.  Scanned the dictionary page with the Valentine wording and added it to the heart.  BTW...most all of these papers are from Paper Trey Ink....the Kraft is my favorite stock. 


And last but not least....the little man's card. The puppy is a Kate Hatfield element.  I just love this gals stuff....and I cut it all out 5 times, cutting different sections off as I went and layered it together with pop dots.  I think Jack will love his little puppy.

Pin It!

February 7, 2012

February Subway Art


Here's my February Subway Art. Better late than never. Feel free to grab it if you want. Enjoy!

Pin It!

The Rest of the Calendar


Hope you enjoyed the series!


....

Pin It!

Calendar 2012


I decided to post the calendar that Nita and I made up together.  Nita made the Jan, Feb, March, April, June & Oct. and I made the rest.  They were made from various kits.  And yes, January is 2013...LOL...I procrastinated too long and just now got this all finished up and going to give to my daughter this afternoon.  This way I had till next Feb. to get next years done...LOL...thank you SO much Nita for giving me a hand and for making the awesome calendar dates template.  It worked like a charm.  I can't wait to get started on next years.  Maybe take a month each month and then it won't be so intimidating next year.  This is a large calendar, each top and calendar is on separate 11 x 8.5, so finished it measures 11 x 17.  I'm going to downsize each page for me...my space on the wall is too small for this size.  The rest of the calendar is in the next post. If anyone wants to know which kits we used, just leave a comment below....

...
Pin It!

LinkWithin

Related Posts Plugin for WordPress, Blogger...