I love seeing these quick moving little birds at my feeder but they normally don't stay still long enough for me to get a shot. He must have been extra hungry because he hung around long enough for me to grab my camera and snap a few quick shots. Luckily I had my zoom lens on but didn't have time to put it on my tripod and I have a hard time holding the camera still with this lens on and zoomed full out. Grabbed a chair and used the back of it for support.
April 21, 2014
Outside my window
I love seeing these quick moving little birds at my feeder but they normally don't stay still long enough for me to get a shot. He must have been extra hungry because he hung around long enough for me to grab my camera and snap a few quick shots. Luckily I had my zoom lens on but didn't have time to put it on my tripod and I have a hard time holding the camera still with this lens on and zoomed full out. Grabbed a chair and used the back of it for support.
April 14, 2014
The Last Sympathy Cards (for now....hopefully, I don't need anymore for a long while)
This is the last sympathy cards I made up...I just changed the colors on this one so I could have two cards but not send exactly alike. The image is a file I bought from JustInklined. The images from here always print up nice and crisp. I wanted it to look layered up on several layers so I took it into Studio Design and placed it on the top layer of my card...this way I knew how much to extend it out over all the layers so it would print on three layers of my card. Once I figured out how big to print the image, it then was just a matter of downsizing each layer but leaving the image the same size. I embossed the sentiment and the border on the top layer after I printed out the image. I then printed out two more layers with the image and started lining them all up and putting them together with foam tape. This first one has three layers and I used yellow ribbon with black pearls.
On this second image, I messed up the middle layer and didn't have time to re-do it. So...I just added two layers instead of three...on this one I used white pearls and teal ribbon. I like the colors of this one better but I like the three layers of the first card the most.
Enjoy!
On this second image, I messed up the middle layer and didn't have time to re-do it. So...I just added two layers instead of three...on this one I used white pearls and teal ribbon. I like the colors of this one better but I like the three layers of the first card the most.
Enjoy!
April 10, 2014
Sharing a few more cards
As you can see, I had a rash of Sympathy cards to make...I'm going to share 4 of them today...the last three are alike except I changed up the color of the blossoms and pearls. Nothing much to share about these...I used embossing folders and cut the blossoms on the Cameo. On the first card, the brush was by Katie Pertiet. I cut the butterfly with the Cameo and then added glitter to it. I printed the sentiment on the velum and then cut the strip for the front of the card. Layered it on some new cardstock I found by Bazzill called Bling...it has this linen look with a beautiful sheen to it. I wish I'd picked up a lot more. The only difference between these two cards is the pearls and the color of the bottom layer.
As you can see...all I did was change up the colors and on the last one, I rounded the corners. I was going after a frame/matted look for the sentiment..I can't emboss but I can fake it...LOL...I think the purple one is my favorite..if you look closely, you can see the beautiful sheen on the purple sentiment frame. And yes, they are all the same white...LOL...I still can't take pictures and get the exposure correct...
That's all for tonight...I've got a couple more Sympathy cards and then Gavin's birthday card...will share those this weekend.
Thanks for looking!
April 9, 2014
Card in a Box
I finally gave this technique a try....the first image is the first one I did and I wasn't real happy with it but the second card was more to my liking. They were fun to design and I can see myself making more of them. Might do one for Mother's Day...
On this image I used elements from a kit by Lori Whitlock called Maggie. The paper is from Birthday Celebration...a collaboration by several different artists. The box cut file was purchased from the Silhouette store. The rhinestones were from a roll that Jerri Ann bought me for Christmas...first time I've used them...I'm a hoarder...can't get myself to use the really pretty stuff...LOL Everything was traced and cut in the Cameo and then I added liquid pearls and glitter to the flowers.
I liked this one much, much better...just more up my alley in colors and design. Everything is from a kit called Little Charmer by Laurie Ann HGD.
My last share today is a birthday card I made up for a friend of mine who turned 60...she is kind of a tom boy so I knew I couldn't do frilly and this is the best I could do...love the colors!
The red dotted paper is from a kit called Retro Red by Robin Sampson and the blue chevon paper is from a paper pack called Breezy Summer by My Clipart store. I added white pen stitching and ran my stars through my Xyron to add adhesive and then glittered them up. The kraft card base is from PaperTrey Ink. The sentiment is by Kolette Hall...I just changed the color and did a print and cut onto the oval shape. I cut the tag shape from kraft cardstock and then made a bit smaller size of the tag, cut it four times and layered it on top of each other with adhesive...then used it to emboss my larger tag shape. That is one thing I wish the Cameo could do..emboss around a cut shape but it doesn't.
That's all for now...if I don't get busy with a birthday card, it will be too late and my grandson will be cardless...LOL....this is the first year that I do not have to make any party stuff...he's finally outgrown the parties and is just having a few over night guest. I kind of miss it!
Thanks for looking!
April 4, 2014
Bunny Banner
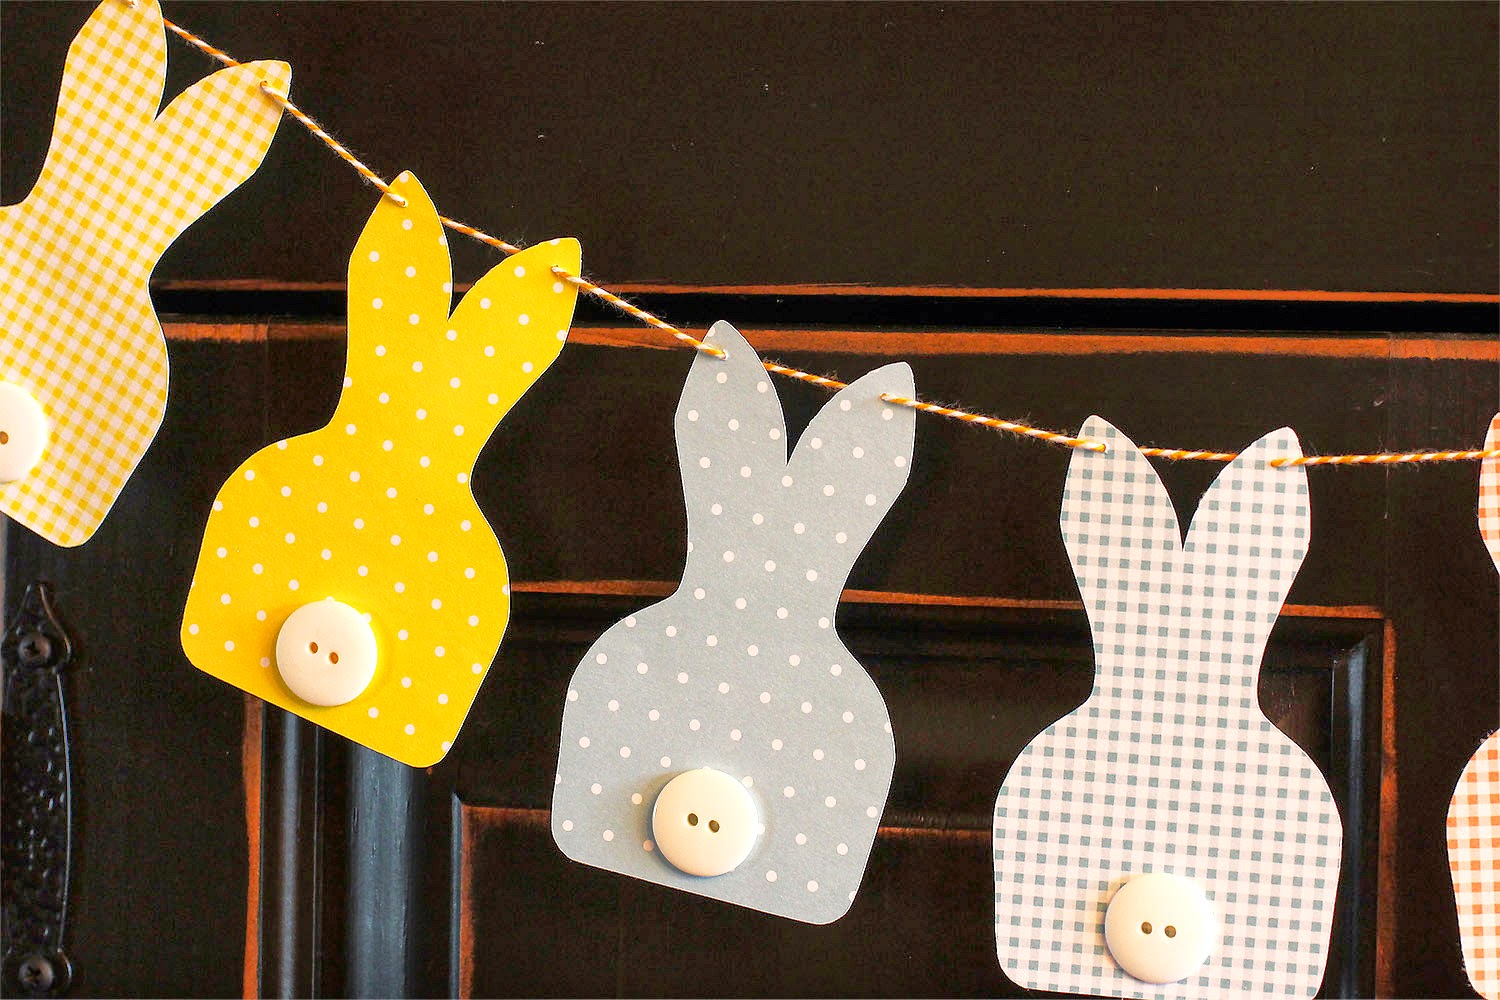
Saw a bunny banner some what like this on Pinterest but it was to buy on Etsy. I didn't want to pay for something this simple to make so I started looking around for a bunny silhouette that I liked that was similar. Found another one but didn't like because the ears were different so I just drew my own in Photoshop. After I finally got the pattern loaded into the Silhouette I cut them from some pastel cardstock that I had on hand. Didn't have any white pom-pom's and didn't want to try making any that small so I got out my collection of white pearl buttons and finally found 8 that was almost alike some shinny and some dull but I think they look great. Stung them together with some orange twine.
I haven't crafted anything for a long time and forgot how much fun it is.
If anyone wants the pattern let me know.
April 3, 2014
Cherry Upside Down Dessert
This is SO good.....I did change up the recipe just a bit....I used Wilderness Sugar Free Cherry Pie filling and it just looked like it was more juice than cherries so I added a can of unsweetened Tart Cherries in water that I drained first. This just added more cherries to the pie filling and only added 6 calories to the dessert because I cut my 9 x 9 inch dessert into 9 servings instead of the 8 that Joanna cut hers.
This is the cast of characters....almond extract, sugar-free cherry pie filling, reduced-calorie margarine, Heart Smart Bisquick mix, Splenda granular, fat-free half and half and slivered almonds...yum, yum....
It even made a very pretty dish before I baked it.
but once it came out of the oven and had that golden color, I wanted to dive in and eat it right then...I refrained and saved it for supper...Bill was in heaven, as cherries are his favorite fruit!
I will be remembering this dessert when I have to take something to a fish fry or BBQ....
Cherry Upside-Down Dessert
Serves 9
1 1/2 tsp. almond extract *
1 (20-ounce) can sugar-free cherry pie filling (I used Wilderness)
1 (20-ounce) can Tart Cherries in water, drained
1/4 cup reduced-calorie margarine * (I used Smart Balance)
1 1/2 cups reduced-fat biscuit baking mix (I used Heart Smart Bisquick)
3/4 cup Splenda Granular (if you use Splenda Blend, I think you could cut it down to 1/2 cup)
2/3 cup fat-free half & half
1/4 cup slivered almonds
Preheat oven to 350°. Spray a 9 x 9 inch baking dish with butter-flavored cooking spray. In medium bowl combine cherry pie filling, drained tart cherries and 1/2 tsp. almond extract. Evenly spoon into prepared baking dish. Drop 4 tsp. margarine by 1/2 teaspoonful evenly over cherry-pie-filling mixture. In a large bowl, combine baking mix and Splenda. Add half & half, remaining 2 Tbs + 2 tsp. margarine and remaining 1 tsp. almond extract. Mix gently to combine. Spoon batter evenly over top. Sprinkle almonds evenly over all. Bake for 18 to 22 minutes. Plan pan on a wire rack and let set for at least 10 minutes. Divide into 9 servings.
189 calories, 7g fat, 3g Protein, 27g Carbohydrates, 366 mg Sodium, 53mg Calcium, 2g Fiber
April 2, 2014
March makes way for April
I had all intentions of posting this image around St. Pat's day but life got in the way, as usual! So...even through it is the 2nd of April, I'm posting it anyway. I loved this rock pot and there was a sign in the plant that said "Leprechaun Toes" ...its really baby tears but the idea was cute....and the sun shining on it all just called to be photographed.
Subscribe to:
Posts (Atom)